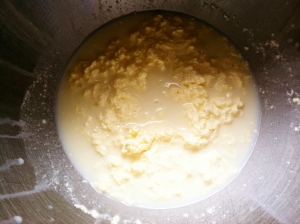
 Yes, I have succeeded at butter making and I’m going to share my electric & non-electric methods with you! Really, I’m not sure what my problem was last night, I think that my cream may not have been warm enough because making butter is easy, seriously easy! And the most I got out of last night was some forearm toning.
For this butter I used raw milk & sea salt.
Non-Electric Method.
- Take 1 gallon (or more) of fresh milk and place it in a clean, large mouthed container. Place this container in the refrigerator for at least 12 hours to 24 hours.
- Remove your milk from the refrigerator and you will see that the cream has indeed risen to the top. With a long handled spoon or shallow ladle begin to skim off the cream from the milk. When you begin to see “watery” streaks in your cream you know you are getting close to the milk. Place your cream into a clean mason jar, large enough that the cream only takes up 1/3 of the jar. You may have to place your cream into a larger container. This is a significant step and could affect the outcome of your butter!
- Tightly cap your jar of cream and set out on your counter to “culture” and place your skimmed milk back into the refrigerator. You will need to allow your cream to culture for about 12 hours, this will give you that butter taste! Your cream should be about 75 degrees when you are ready to begin making your butter with only a slightly sour smell.
- Now find your favorite music, make sure that it has a good rhythm.
- Start shaking. Keep shaking. Really shake it. Although, you will have to get a feel for what you are looking for, most often butter will begin separating from the buttermilk after 15 to 30 minutes. This is an ideal time to involve the kids! Everyone can take a turn shaking the jar.
- You will feel the cream begin to get heavy just before the butter and buttermilk begin to separate. Then you will start to see small granules of butter form, but keep shaking! You want to continue agitating the cream until you begin to see large clumps or a mass of yellow butter separate from the buttermilk.
- Now you can let the butter/buttermilk rest for about 2 minutes. This will allow the butter to rise to the top, making it easier to strain away from the buttermilk.
- Strain your butter, and reserve the buttermilk in a tightly capped jar and place in your refrigerator for later use.
- Now give your butter a quick ice water rinse and place it into a clean bowl.
- Begin kneading the butter against the sides of the bowl, squeezing out any remaining buttermilk, pour any buttermilk into your jar and place back in refrigerator.
- Salt your butter, and remember a little goes a long way!
The Electric Method:
- Take 1 gallon (or more) of fresh milk and place it in a clean, large mouthed container. Place this container in the refrigerator for at least 12 hours to 24 hours.
- Remove your milk from the refrigerator and you will see that the cream has indeed risen to the top. With a long handled spoon or shallow ladle begin to skim off the cream from the milk. When you begin to see “watery” streaks in your cream you know you are getting close to the milk. Place your cream into a clean mixing bowl, making sure that the cream only fills 1/3 of the bowl. This is a significant step and could affect the outcome of your butter!
- Tightly cap your jar of cream and set out on your counter to “culture” and place your skimmed milk back into the refrigerator. You will need to allow your cream to culture for about 12 hours, this will give you that butter taste! Your cream should be about 75 degrees when you are ready to begin making your butter with only a slightly sour smell.
- Afix your whisking beater to your mixer, and set the speed to just between low and medium.
- Mix for about 5 minutes and check your cream. You should see the beginnings of separation.
- Continue mixing at the same speed until you see large clumps of butter beginning to form. Stop to scrape the butterfat down from the sides of the bowl as needed.
- Now you can let the butter/buttermilk rest for about 2 minutes. This will allow the butter to rise to the top, making it easier to strain away from the buttermilk.
- Strain your butter, and reserve the buttermilk in a tightly capped jar and place in your refrigerator for later use.
- Now give your butter a quick ice water rinse and place it into a clean bowl.
- Begin kneading the butter against the sides of the bowl, squeezing out any remaining buttermilk, pour any buttermilk into your jar and place back in refrigerator.
- Salt your butter, and remember a little sea salt goes a long way!
Enjoy your raw milk butter on freshly made wheat bread, corn on the cob, or any other favorite food. If you are my daughter Grace you will enjoy it on a spoon!
Questions? Email me at themothermucker@gmail.com


